Table of Content
QSRs that adopt digital menu boards see an average sales increase of 33%, and 74% of customers say an easy-to-read menu is their top priority. Imagine the impact on your restaurant's bottom line when you combine captivating visuals, real-time updates, and targeted promotions. That's the power of digital menu boards.
But how do you ensure your digital menu board is effective, visually appealing, and easy to manage? In this guide, we'll walk you through setting up your digital menu board with Look Digital Signage, from a guided integration process, designing and publishing your menu to setting up automation with Zapier.

Benefits of Digital Menu Boards
Enhanced Customer Experience
Digital menu boards make it easier for customers to decide what they want. With bright, clear images and even videos of menu items, customers can get a better idea of what they're ordering. This visual appeal can make dishes look more appetizing and help customers feel more confident in their choices.
Plus, digital boards can quickly highlight special promotions or seasonal items, keeping the menu fresh and interesting.
Increased Sales and Upselling Opportunities
Interactive digital menu boards enable you to increase your average order value without coming off as aggressive. And this can be applied throughout the customer journey.
When a customer selects a main course, the menu board can dynamically suggest complementary side dishes or beverage pairings. As they progress to dessert tempting visuals and enticing descriptions of high-margin items can encourage impulse purchases.
During checkout, a gentle reminder about add-ons like extra sauces or premium toppings can nudge customers towards a larger order.
But even without direct interaction with a self-ordering menu, you can drive more sales by placing high-margin items in prominent positions on the screen and displaying limited offers or combo dishes.

Easy Updates and Customization
One of the best things about digital menu boards is how simple they are to update. Whether you need to change prices, add new dishes, or promote a special offer, it can all be done instantly without the hassle of reprinting menus. This flexibility means you can always keep your menu up-to-date and relevant. You can also customize the display to show different menus at different times of the day, like breakfast in the morning and dinner in the evening, automatically.
With advanced systems, you can integrate your menu board with your inventory management software to trigger automatic adjustments on the menu based on stock levels. With this setup, you’ll reduce the likelihood of disappointing customers and also reduce food wastage.
Cost-Effectiveness and Sustainability
While there’s an initial cost to set up digital menu boards, they can save money in the long run. You won’t need to constantly print new menus, which cuts down on printing costs and reduces paper waste. This not only saves money but also supports eco-friendly practices, which can be a big plus for customers who care about sustainability.
Empowers Dietary Choices
People want to know what’s in their food and that includes ingredients, calorie counts, and potential allergens. Using your digital menu, you can display this information to help customers make informed choices that fit their health goals or dietary restrictions. Additionally, you can easily showcase vegan, gluten-free, or other specialty items to cater to a wider range of preferences.
Queue Management and Order Flow Optimization
You can manage your customer's expectations and reduce their perceived wait times by displaying estimated wait times or highlighting quick-serve options during peak hours. In a more sophisticated scenario, these boards can work together with kitchen management systems to dynamically adjust menu offerings based on current kitchen capacity, for a smoother operational flow and consistent food quality.
Step-by-Step Guide on How to Set Up a Digital Menu Board with Look DS
1. Choosing the Software
To ensure that your menu boards remain engaging, you need a central solution to create and manage your menu content across your entire network. That’s where digital signage software comes in, to be more precise, the Look DS.
These features should be a priority in your content management system:
- Real-time content updates, which allow you to quickly adjust prices or menu items as needed.
- A scheduling feature that enables you to automate menu changes based on the time of day or day of the week.
- The availability of customizable templates is another important factor, as these can significantly reduce design time and ensure a professional appearance.
- Additionally, consider the software's flexibility in content management and design customization.
Over the years, our software solution has eliminated menu-related bottlenecks across restaurants with multiple locations. Look Content Manager comes with all these features and more with a user-friendly interface and dozens of resources to help you set up your menu board in no time.

2. Creating Your Menu Content
Designing Eye-Catching Menus: To begin, navigate to the layout section within the Look CMS interface. Here, you'll find a variety of menu templates designed to suit different restaurant styles and cuisines.
Utilizing Templates and Layouts in Look CMS: Select a template that aligns with your restaurant's aesthetic and menu structure. Once chosen, these templates are fully customizable, allowing you to modify all elements to match your brand. You can replace stock photos with images of your actual dishes, adjust titles and descriptions to reflect your menu items, and modify fonts and colors to align with your brand identity.
Tips for Effective Menu Design:
- Less is More: Don't overcrowd your menu. Instead, focus on highlighting your best-selling or most profitable items.
- Call to Action: Include phrases like "Try our new..." or "Chef's recommendation" to encourage customers to order.
- High-Quality Images: Use high-resolution images of your dishes to make them look more appetizing. Customers often grapple with decision fatigue, and there’s nothing that’ll help them make their decision faster than an appetizing image. This is where the CTA will come in handy as well.
- Consistency: The menu design should be consistent in font style, color scheme, and layout structure to achieve a cohesive look.
- Readability: To ensure that text is easy to read from a distance, use contrasting colors for text and background, and choose fonts that are legible.
- Highlight Specials: To draw attention and encourage customers to try something new, design your special offers or seasonal items with different colors or styles so that they stand out.
- Dynamic Content: Take advantage of the ability to update your menu in real time. Use this feature to display different menus at different times of the day (e.g., breakfast, lunch, dinner) or to highlight daily specials.
- Animations and Transitions: Use subtle animations and transitions to make your menu more engaging. For example, you can have images slide in or text fade in and out. However, avoid overusing these effects as they can become distracting
More tips for your menu’s design you’ll find in this article and in the video:
3. Uploading and Managing Your Menu
Using Look CMS to Upload Content: Once you've created your menu content, uploading it to Look DS is simple. You can drag and drop your files or import them from your computer. Then create an empty playlist that will serve as the container for your menu content.
After creating the playlist, you can add your customized layout to it. This step is where your designed menu becomes part of your digital signage content. With the layout added to the playlist, you can then assign this playlist to your digital display for customers to see.
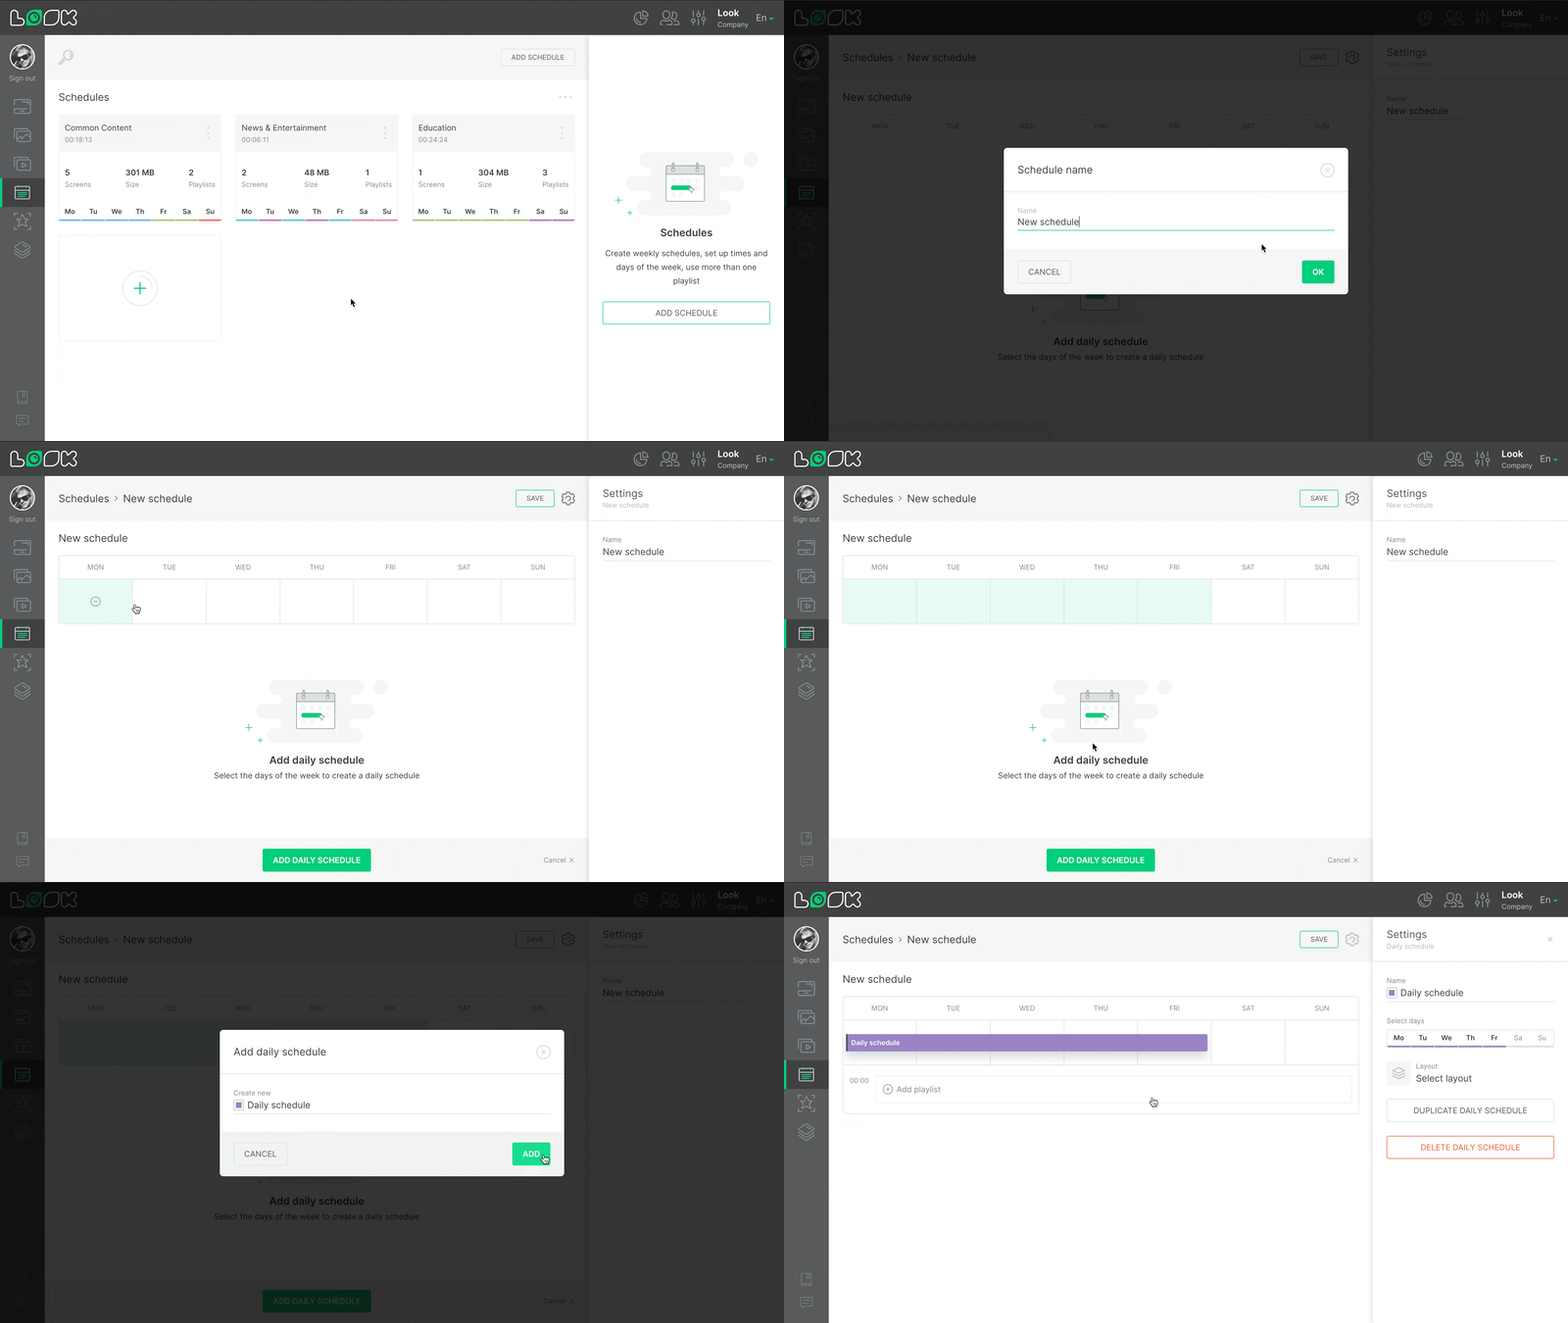
Organizing and Scheduling Menus: Within your Look portal, you can easily organize and schedule your menu content to ensure that the right information is displayed at the right time.
You can have separate playlists for different times of the day, special promotions, or seasonal offerings. This allows you to manage and update your content in an organized manner.

Scheduling Content: Look DS provides robust scheduling features to automate the display of your menus. Here’s how to make the most of these features:
- Set Time-Based Schedules: You can set specific times for each playlist to be displayed. For example, schedule your breakfast menu to appear from 7 AM to 11 AM, your lunch menu from 11 AM to 3 PM, and your dinner menu from 3 PM onwards. This ensures that the correct menu is always shown to your customers.
- Day-Parting: Use day-parting to segment your day into different parts and assign relevant content to each part. This is ideal if you offer different menus or specials at various times throughout the day.
- Recurring Schedules: If you have regular promotions or events, you can set up recurring schedules. For example, if you have a happy hour menu that runs from 4 PM to 6 PM every weekday, you can schedule this playlist to recur automatically without needing to update it daily.
- Special Events and Promotions: For special events or limited-time promotions, you can create one-time schedules. This is useful for holiday specials, seasonal promotions, or any unique events that require temporary changes to your menu.
Real-Time Updates: One of the significant advantages of using Look DS is the ability to make real-time updates to your menus. If you need to change a price, update a description, or swap out an item, you can do so instantly from the Look CMS, and it will reflect immediately on your digital menu boards.
Check out our article on how to schedule your digital signage content.
Automate Your Digital Menu Updates with Zapier and Look
Even with the scheduling feature that automates transitions between different menu items, you can take it a notch further with Zapier and Look.
Step-by-Step Guide to Integration
Connecting Look Digital Signage with Zapier
- In the Look DS CMS, navigate to the Company Settings section and locate your Action API Key.
- In Zapier, create a new Zap and choose your desired trigger app (e.g., Google Sheets).
- Select the trigger event (e.g., "New or Updated Spreadsheet Row").
- For the action app, search for and select "Look Digital Signage."
- Authenticate the connection by pasting your Look DS Action API key.
Using Google Sheets for Automatic Updates
- Create a Google Sheet with columns for menu item names, prices, descriptions, etc. Ensure your sheet has a header row with column labels.
- In the "Trigger" section of your Zap, select the specific Google Sheet and worksheet you want to monitor.
- In the "Action" section, choose the Look DS Layout that contains the digital menu you want to update.
- Map the data from your Google Sheet to the corresponding text fields in your Look DS Layout. For example, map the "Price" column in your sheet to the price text element on your menu board.
- Update a value in your Google Sheet and check your digital menu in Look DS to ensure the change is reflected.
Example: Dynamic Pricing
Let's say the price of salmon changes. Once you update the change in the relevant cells on your Google spreadsheet, Zapier will detect this as a trigger event. It will then extract the updated data from the Google Sheet cell and send it to Look DS through the “Send Action” event. Look receives the new data and modifies the price instantly on the menu board.
Look Case Study in Dynamic Menu Boards
BarrelHouse Brewing Co. in California
BarrelHouse Brewing Co., a successful brewery with four popular tap rooms, turned to Look DS's digital signage solution to overcome communication challenges across its locations. The company required a system that was simple enough for team members to use, particularly for uploading and managing their signage content.
Look DS delivered a user-friendly platform that met these needs, allowing for easy content management across each location from a central location. This setup led to more efficient content management and a better customer experience. The scalable Look DS system also provided a future-proof solution that could grow with the company.
Conclusion
We have discussed the numerous benefits that digital menu boards can bring to your restaurant, from enhancing the customer experience to boosting sales and streamlining operations. We've also provided a comprehensive guide on how to set up your dynamic menu using Look Digital Signage, along with inspiring examples of how other businesses have successfully implemented this technology.
Now, it's time to take the next step and experience these advantages firsthand. Sign up for our 14-day free trial of Look Digital Signage and discover how easy it is to create eye-catching, interactive menus that will captivate your customers and drive your business forward. Don't miss out on this opportunity to revolutionize your restaurant's menu – start your free trial today!


![Top 10 Easter Advertising Ideas to Drive Sales [+ Examples]](https://cdn.prod.website-files.com/5f46c318c843828732a6f8e2/65fa8697f31661d9d0bb6a01_Easter-Advertising-thumbnail.webp)


